Tables I
Tables are an invaluable tool for presenting data in a clean way. But they always come with a few complications. What happens when the content extends the table cell? Do we want the table to fill the space to full page width, or just large enough to fit its contents? How do we align cells on decimal points?
All these questions will be answered, I promise, although it takes quite a bit of setup.
Some time ago, I migrated an older version of this website to a brand new one. Faster, better, more modern. Almost all my HTML code could be converted to Markdown with some tools … but not tables. I had to manually copy-paste the contents of each table and rewrite to Markdown syntax. Those were a few not-so-fun days 😔
The Tabular Environment
The syntax for creating a tabular environment is
1\begin{tabular}[position]{columns}
2    row 1, column 1 & … & row 1, column n \\
3    row 2, column 1 & … & row 2, column n \\
4    % ...
5\end{tabular}
Cells in a row are separated with an ampersand ( & ). A new row is started with the newline command ( \\ ).
Columns
The mandatory columns argument decides the types of every column. How are they aligned? How will they resize? Do they allow line breaks like they are paragraphs?
It needs a sequence of any of the following specifiers.
| Specifier | Description |
|---|---|
l | Column of left-aligned items |
r | Column of right-aligned items |
c | Column of centred items |
p{width} | Column with fixed width width, that wraps lines like a normal paragraph. A forced line break, however, may not occur. |
| | Vertical line the full height and depth of the environment |
|| | Double vertical line |
*{num}{columns} | Creates num copies of columns |
@{text} | Inserts text in every row, and kills all white space between columns. The special \extracolsep{width} command causes an extra space of width width to appear to the left of all subsequent columns, until another command like this occurs. |
1\begin{tabular}{l | p{20pt} | r | *{2}{c | }}
2    Lorem ipsum & Lorem ipsum & Lorem ipsum & Lorem ipsum & Lorem ipsum \\
3    Lorem ipsum, dolor & Lorem ipsum, dolor & Lorem ipsum, dolor & Lorem ipsum, dolor & Lorem ipsum, dolor
4\end{tabular}
The l, c and r specifiers do not allow line breaks. They will keep stretching cell width to fit all content. If you don’t want that, use the p specifier instead.
If you, however, don’t want this setting for the entire column, you can create a paragraph inside an individual cell with
\parbox[position]{width}{text}
1\begin{tabular}{l | r @{.} l}
2    \parbox[t]{50pt}{A new pair of shoes} & 9 & 81 \\
3    Crisps & 2 & 04
4\end{tabular}
Position
Tables can’t be split among multiple pages. The default behavior is, therefore, not to place tables in line with the text. It’s to place them wherever they fit best.
This took me by surprise, time and time again, when I started using LaTeX. I was so used to typing some text about a table and then placing the table immediately after it.
Like on this website. Imagine the table below would just be completely somewhere else on the page!
Fortunately, you can influence this. A table can have one of four positions:
| Specifier | Description |
|---|---|
h | The table is placed here, exactly where it is in the code |
t | The table is placed at the top of the page |
c | The table is placed in the centre of the page |
b | The table is placed at the bottom of the page |
p | The table is placed on a separate page that contains no text. That page only contains tables and other figures repositioned this way. It’s called a page of floats, and we’ll look at it later. |
Star Variation
The starred variation has an extra mandatory argument that specifies the width of the table. It will always adhere to whatever you put in, but it doesn’t automatically distribute space evenly, which can make it look really weird. The syntax is
1\begin{tabular*}{width}[position]{columns}
2    % ... cells ...
3\end{tabular*}1A nice paragraph.
2
3\begin{tabular*}{\textwidth}[h]{l | l | l}
4 Cell 1 & Cell 2 & Cell 3 \
5 \hline
6 Cell 1 & Cell 2 & Cell 3
7\end{tabular*}
8
9Another nice paragraph.
Lines
We’ve already seen how to insert vertical lines. Now let’s insert horizontal lines!
The \hline command creates a line the full width of the table. And \cline{a-b} creates a line between columns a and b (both inclusive).
Note that these are typed as part of the table content, among the cells. Not as part of the arguments put into the environment.
1\begin{tabular}{l | l | l}
2    Cell 1 & Cell 2 & Cell 3 \
3    \hline
4    Cell 1 & Cell 2 & Cell 3 \
5    \cline{2-3}
6    Cell 1 & Cell 2 & Cell 3
7\end{tabular}
Spanning Multiple Columns
If you want a cell to span multiple columns, use
1\multicolumn{columns}{position}{text}The first argument, columns, specifies the number of columns to span.
The second, position, specifies the formatting: c for centred, l for flushleft, r for flushright.
The third, text, specifies the text within the multicolumn.
1\begin{tabular}{l | l | l}
2     & \multicolumn{2}{c}{Gender} \
3    \hline
4     & Male & Female \
5    \cline{2-3}
6    Survey 1 & 55 & 80
7\end{tabular}
Spanning Multiple Rows
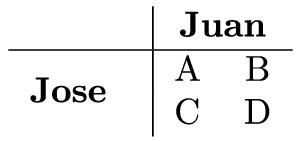
For a cell spanning multiple rows, you first need to include the package multirow. Then use …
1\multirow{number of rows}{width}{text} 1\usepackage{multirow}
2
3\begin{document}
4 \begin{tabular}{l | l c c c}
5 & \multicolumn{2}{c}{\textbf{Juan}} \
6 \hline
7 \multirow{2}{10mm}{\textbf{Jose}} & A & B \
8 & C & D\
9 \end{tabular}
10\end{document}
Breathing Space
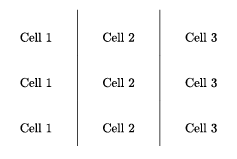
The \tabcolsep length sets the horizontal space between columns. The \arraystretch command sets the vertical space between rows.
Yes, the difference of length vs command is emphasized. It’s a bit confusing. The latter is just a value, but it must still be handled as a command.
1\setlength{\tabcolsep}{20pt}
2\renewcommand{\arraystretch}{3}
3
4\begin{tabular}{l | l | l}
5    Cell 1 & Cell 2 & Cell 3 \
6    Cell 1 & Cell 2 & Cell 3 \
7    Cell 1 & Cell 2 & Cell 3
8\end{tabular}
Want to support me?
Buy one of my projects. You get something nice, I get something nice.
Donate through a popular platform using the link below.
Simply giving feedback or spreading the word is also worth a lot.