Mating Patterns
Against decent players, checkmating is hard, even if you have a huge piece advantage. On the other hand, you might be able to checkmate an unsuspecting opponent very early in the game with two or three brilliant moves.
I’d like to, therefore, discuss some basic patterns which are used to checkmate someone 99% of the time. Knowing what endgame you want, and how you want to close out the game, helps plan your attacks and respond to your opponent’s threats.
Two main types of mating patterns exist:
- The back rank mate: if the king is against the back rank, he has only 5 moves left he could make, which makes it easier to checkmate him. Most players use two rooks to drive the enemy king towards the back rank (by constantly checking him).
- The double direction mate: attacking the king from multiple directions at the same time. This means that one piece attacks diagonally (bishop, queen or pawn), and another attacks straight (queen or rook).
You can use this to constantly check the king and force it into a corner, where it is then checkmated. If the king has some pieces around it (usually its own pawns), then you don’t need to push it away. He already has limited movement options.
If the king is positioned to the side of the board, you can use these variations:
- Using two different diagonals
- Or one straight line + one knight.
Often though, checkmate comes from a combination of both methods.
Let me give you some examples to clarify these concepts. Most of these are named after their inventors or points of origin. Also note that these mating patterns don’t always come in the ideal way (actually, they generally don’t), which means you must train yourself to recognize opportunities and force the opponent into the spot you want.
Back Rank Mate
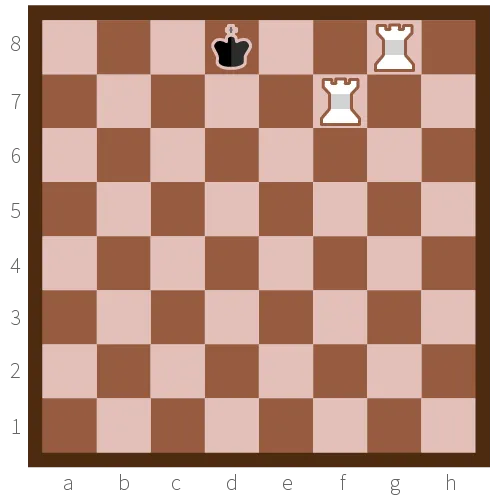
The most common way to checkmate. If you have an advantage of one or two pieces, you can safely bring one or two pawns to the other side of the board for promotion. Then, if you have two rooks, or a rook and a queen, you can move them closer to the king, one by one, to eventually checkmate your opponent.
Anderssen’s Mate
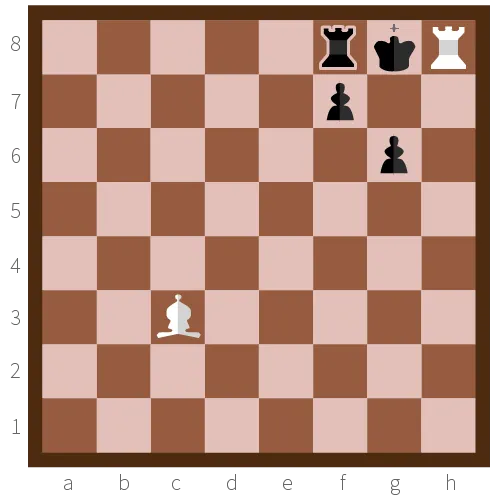
Use this when the opponent has castled and has a weak pawn structure on the kingside. You can’t really force the opponent to castle, but most players do it as quickly as possible anyway, which makes this a very useful pattern to know.
If the king still has its three pawns in front of him, you can destroy it with a sacrifice—attacking with a valuable piece which the opponent can’t resist to take with his pawns.
Putting a bishop on the long diagonal is almost always a good idea, as it runs through the centre, while still keeping the bishop relatively safe.
Morphy’s Mate
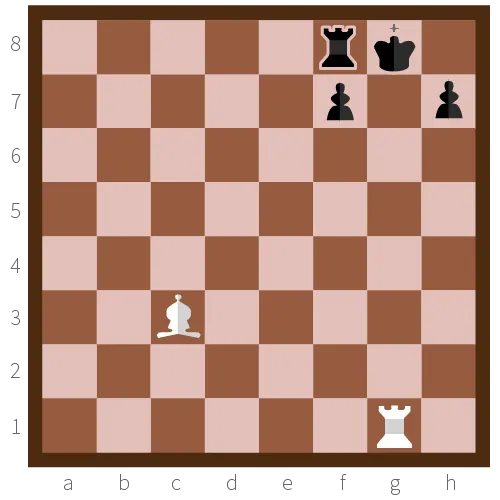
This pattern is more or less a variation on the Anderssen’s mate. The king is castled and behind some pawns, but this time the middle one has to be somewhere else or captured. This means that the king is checkmated on g8 instead of h8.
Morphy’s Mate with Knight
Instead of a rook and bishop, it uses a queen, which is covered by a knight. The knight is an ideal piece, because it can’t be attacked by any pieces directly surrounding the king, while it does provide two guarded squares close to the king.
It depends on the king’s position if you need to move your queen to the other guarded square after the initial check.
Greco’s Mate
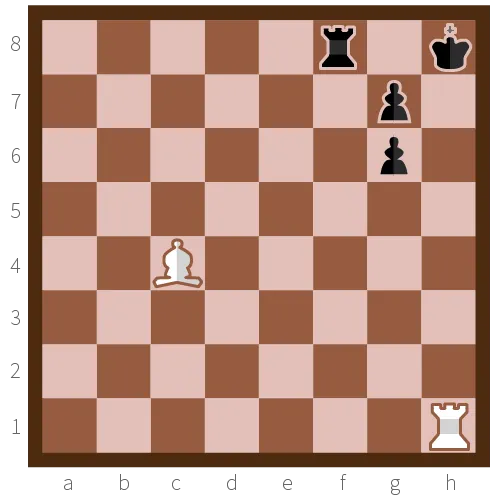
The last of three mating patterns for a castled king with weak pawn line. This time, the king is on h8, and has lost his pawns on the f and h file. The pawn on g7 is crucial for this mate. It can’t be any other piece—that piece would be able to interfere with the rook’s attack towards the king.
Greco’s Mate with Knight
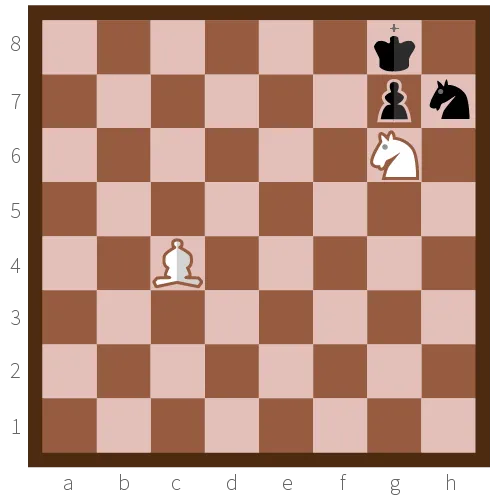
As the title implies, this pattern uses a knight to effectively block off three straight squares, much like the rook did in Greco’s mate. There need to be two pawns or pieces in front of the king, to the right, which can’t capture the knight or move in such a way that they stand between the bishop and the king.
Remember that we’re talking about certain mating patterns here. So the opponent should not, in any way, be able to solve the problem on their side.
Damanio’s Mate
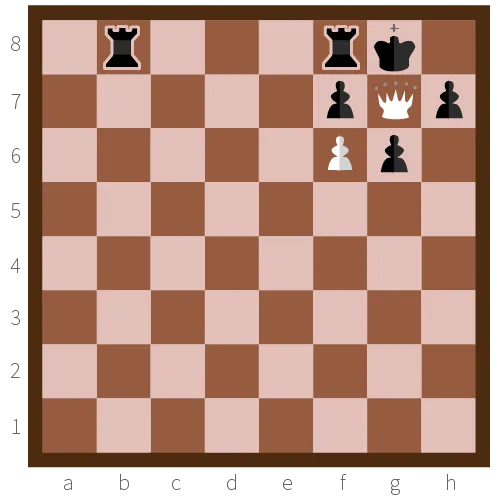
The picture is just one example of this pattern. If the king is at any position on the back rank, you can place a (guarded) queen right in front of him, and he will be checkmated. Again, realize that—just as any pattern—this queen represents both diagonal and straight lines working together to checkmate.
Anastasia’s Mate
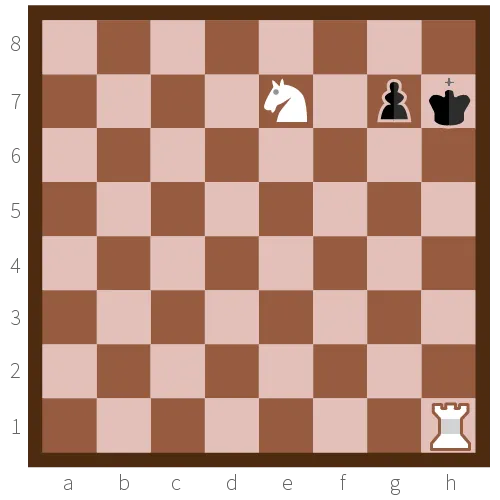
One of the trickier mates. The king needs to be pushed toward the edge of the board. Then the final blow is delivered by a rook on the same line. The knight can block off two of the three remaining moves, but not all of them. There will have to be a pawn or piece there.
Arabian Mate
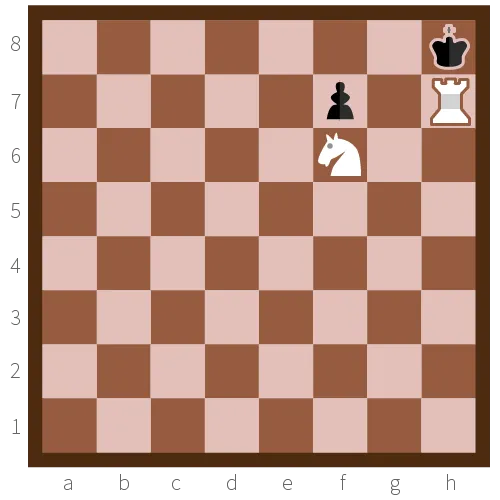
A variation on Anastasia’s mate, requiring a slightly different position of the king (and not necessarily any other enemy piece). The knight is placed in such a way that it can guard a rook on h7, and at the same time block off movement in the other straight direction. The diagonal movement is blocked by the closely placed rook.
Blackburne’s Mate
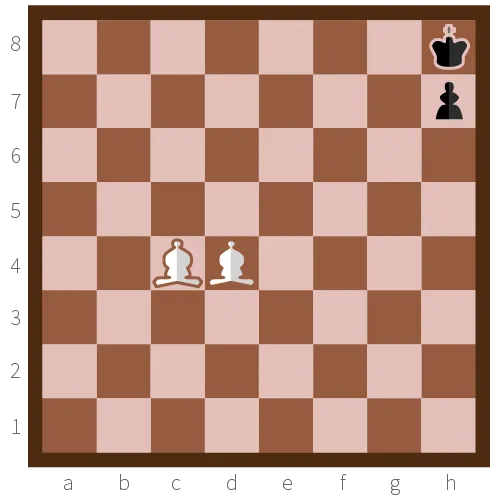
This pattern needs very convenient circumstances. But in a game with no major pieces (rooks or queen), it can make all the difference. It requires two bishops, a king pushed towards the corner, and one pawn behind which he can take shelter.
Boden’s Mate
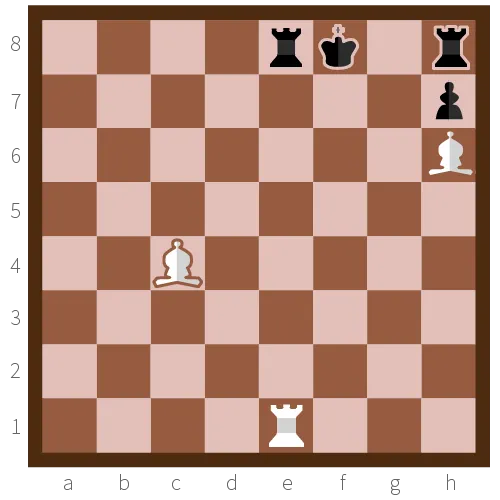
Also works with two bishops, but requires an additional rook on your side. The advantage though, is that it allows more enemy pieces surrounding the king.
Smothered Mate
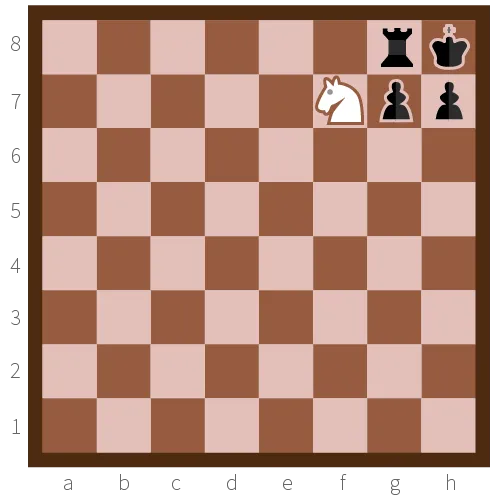
A pattern that often requires a sacrifice. The pieces blocking off the king’s movement don’t have to be a rook and two pawns—they can be anything that can’t capture the knight.
Want to support me?
Buy one of my projects. You get something nice, I get something nice.
Donate through a popular platform using the link below.
Simply giving feedback or spreading the word is also worth a lot.